Scanning an Item Directly
The simplest form of inventory consumption is scanning an item's own barcode label. Standard Time® matches the scan value against five identifier fields on each inventory record:
- Name — the item's display name
- Code — an internal item code
- SKU — your own stock-keeping unit number
- Vendor SKU — the SKU assigned by your supplier
- Manufacturer SKU — the OEM part number on the manufacturer's label
If the scan value matches any one of these five fields, Standard Time® locates the inventory record and deducts exactly one unit from the quantity on hand. The deduction is logged immediately and tied to the active work order or job if one is open on that station.
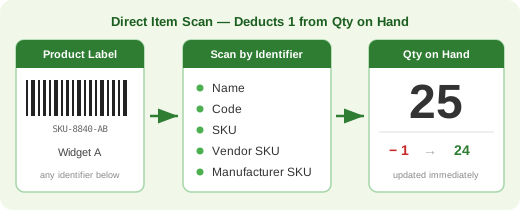
This approach works well in two scenarios:
- High-velocity single-unit consumption — operators pulling one fastener, one component, or one assembly at a time scan the bin label directly. Each scan removes one unit from stock with no prompts or keyboard entry.
- Manufacturer-labeled parts — incoming parts already printed with a manufacturer or distributor barcode can be scanned directly if that barcode is stored as the Manufacturer SKU on the inventory record.
INV-SUB — Prompted Quantity Deduction
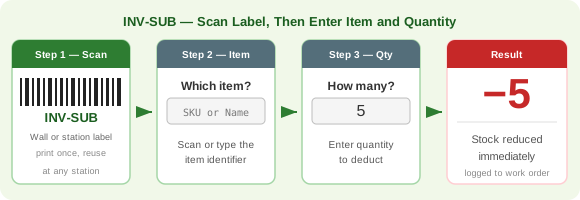
INV-SUB is a special barcode label you print once and post at a workstation, receiving dock, or anywhere stock is consumed. Unlike scanning an item's own label, INV-SUB does not require you to scan each unit individually. Instead, it opens a prompt that asks which item and how many — letting an operator pull twenty bolts from a bin and record the deduction in a single scan sequence.
How INV-SUB Works
- Scan the INV-SUB label posted at the station.
- A prompt appears: Which item? — Enter the item's SKU, name, code, vendor SKU, or manufacturer SKU. You can type it or scan the item's own barcode label.
- A second prompt appears: How many? — Enter the quantity to deduct.
- Standard Time® deducts the entered quantity from the item's stock immediately and logs the transaction against the active work order.
When to Use INV-SUB
INV-SUB is most useful when you are pulling multiple units of the same part in one batch — a handful of screws, a set of gaskets, a measured length of material. It avoids the need to scan each unit individually and works even when the item's individual barcode label is not accessible (bulk bins, rolls, bags).
INV-ADD — Add Stock
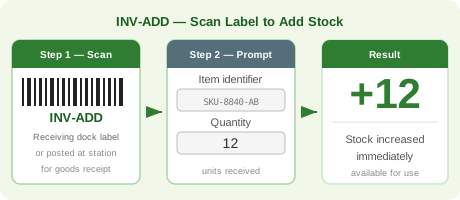
INV-ADD is the receiving counterpart to INV-SUB. Scan the INV-ADD label when goods arrive, when production yields finished parts, or any time stock needs to increase. Like INV-SUB, it prompts for the item identifier and a quantity.
How INV-ADD Works
- Scan the INV-ADD label posted at the receiving dock or production area.
- Enter the item identifier (SKU, name, code, vendor SKU, or manufacturer SKU).
- Enter the quantity received or produced.
- Standard Time® adds the entered quantity to the item's stock on hand immediately.
Common Uses
- Goods receipt — receiving an inbound shipment at the dock, confirming purchase order quantities.
- Returned material — adding back parts that were pulled for a job but not used.
- Production output — recording finished parts coming off a machine or production cell (for manual builds, as opposed to the INV-BUILD flow described below, which also deducts the parts).
- Physical count corrections — adjusting stock upward after a count reveals more units than the system shows.
INV-SCRAP — Record Scrapped Material
INV-SCRAP removes material from stock because it was wasted, damaged, or otherwise unusable — not because it went into a finished job. It works just like INV-SUB (scan the label, enter the item, enter the quantity), but the transaction is labeled as scrap so waste can be told apart from normal consumption.
How INV-SCRAP Works
- Scan the INV-SCRAP label posted at the station.
- A Scrap Inventory prompt appears — scan or type the item's name, code, SKU, vendor SKU, or manufacturer SKU.
- A Quantity prompt appears — scan or enter how many were scrapped.
- Standard Time® deducts that quantity from stock and confirms with a message such as “Hex Bolt M6 scrapped.”
What Makes Scrap Different from INV-SUB
- Same deduction. Stock goes down by the quantity entered, and if the item is an assembly with a Bill of Materials, its component items are deducted too, exactly as with INV-SUB. Stock never drops below zero.
- Expenses are labeled Scrap. If the item has Create new expense checked, the expense it creates uses the Scrap expense type and its description ends with “scrapped,” so your reports can total scrap cost separately from material used on jobs. (The Scrap expense type is created automatically the first time it is needed.)
- Timer rule still applies. If the item has Require timer for scan checked, the employee must have a timer running before scrapping it — the scrap expense then lands on that timer's project, client, and category.
- A quantity is required. A quantity of zero is rejected; nothing is deducted.
INV-QTY — Check What’s In Stock
INV-QTY answers “how many do we have, and where?” without changing anything. Scan it, scan an item, and Standard Time® shows the quantity in stock and where it is stored. It is a read-only lookup — nothing is added, deducted, or expensed, and no timer or employee scan is needed.
How INV-QTY Works
- Scan the INV-QTY label.
- An Inventory Quantity prompt appears — scan or type the item's name, code, SKU, vendor SKU, or manufacturer SKU.
- The result appears on the scan screen, for example:
- Hex Bolt M6: 240.00 in stock. Main Warehouse: 200.00, Bin A-3: 40.00 — an item tracked in several locations shows each location's count.
- Gasket 4in: 18.00 in stock. Location: Shelf 2 — an item with a single storage location shows that location.
- Glue Stick: 75.00 in stock — no location is recorded for the item.
When Something Goes Wrong
- Not found — if nothing matches the name or SKU, you'll see a red message saying it is not a valid inventory name or SKU.
- Multiple matches — if the name or SKU matches more than one item, you'll see a “multiple items found” message. Keep SKUs and codes unique so lookups are never ambiguous.
Require Timer for Scan & Create New Expense
Every inventory item has two Properties panel checkboxes that connect its scans to time tracking and job costing: Require timer for scan and Create new expense. Neither changes how you scan an item — they change what Standard Time® checks and records when you do.
Require Timer for Scan
When this is checked on an item, that item can't be pulled from stock — by scanning it directly or through INV-SUB or INV-SCRAP — unless the scanning employee already has a timer running on a project. If no timer is running, the scan is rejected on the spot and nothing is deducted; the operator has to start their job timer first, then scan the item again.
This check only guards consumption. INV-ADD — receiving or returning stock — is never blocked by this setting, even on an item flagged to require a timer, since adding stock doesn't need to be tied to a job.
Create New Expense
When this is checked, scanning the item does more than change its Qty in Stock — it also writes an Expense record, Standard Time®'s material-cost log. This applies to INV-ADD, INV-SUB, and INV-SCRAP scans, so receiving, consuming, and scrapping stock can all leave a cost trail if you want one. Scrap expenses are filed under the Scrap expense type.
If a timer happens to be running at the moment of the scan, the new expense automatically picks up that timer's Project, Client, and Category — so the material lands on the same job as the labor being logged at the same time. Reports can then combine time logs and expenses to show full job cost, labor and materials together, for a single project.
INV-BUILD — Build from Bill of Materials
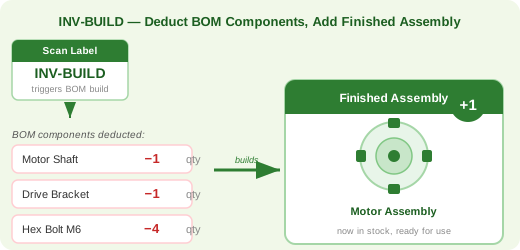
INV-BUILD records the assembly of finished goods from their parts. Like INV-ADD and INV-SUB, it prompts for an item and a quantity — but the item is a finished assembly that has a Bill of Materials (BOM). Standard Time® adds the quantity you entered to the assembly's stock and deducts each component's required quantity, multiplied by that same number, from the parts' stock. The finished assembly is then available as an inventory item that can itself be scanned, pulled for future work orders, or used as a component in a higher-level BOM.
How INV-BUILD Works
- Scan the INV-BUILD label posted at the assembly station.
- A prompt appears: Please scan inventory name or SKU — scan or type the finished assembly's name, code, SKU, vendor SKU, or manufacturer SKU.
- A second prompt appears: Please scan or enter quantity — enter how many finished assemblies were built.
- Standard Time® adds that quantity to the assembly's stock on hand.
- Each component in the assembly's Bill of Materials is deducted by its required quantity × the number built — for example, if the BOM calls for 4× Hex Bolt M6 and you built 5 assemblies, 20 Hex Bolts are removed from stock.
- The scan screen confirms with a message such as “BOM inventory build: Motor Assembly.”
Multi-Level BOM
If a BOM component is itself a built assembly — a sub-assembly that also has its own BOM — the deductions cascade down through the hierarchy: the sub-assembly's own stock is reduced, and so are its parts, in the correct proportions for the quantity being built.
Timer and Expense Settings
The assembly item's Require timer for scan and Create new expense settings apply to a build the same way they do to INV-SUB: if the assembly requires a timer, the employee must have a timer running before a build scan is accepted.
When the Finished Assembly Is “In Stock”
After INV-BUILD runs, the finished assembly's stock goes up by the quantity you built. That stock is real and consumable — a future work order can pull the finished assembly just like any other part, either by scanning its own label, or via INV-SUB. This supports a two-stage manufacturing model: build a batch of sub-assemblies in advance, then scan them out to final assembly jobs later.
Defining and Checking a Bill of Materials by Scan
Two companion modes let you work with a BOM using only the scanner. Each one ends when you scan INV-STOP.
- Define a BOM — INV-BUILD-START. Scan it, then scan the assembly's name or SKU (a new assembly record is created if it doesn't exist yet). Every item you scan after that is added to the assembly's BOM with a quantity of 1; items that don't exist yet are created for you. Adjust quantities afterward in the Bill of Materials grid. Scan INV-STOP when you're done.
- Verify a BOM — INV-CHECK. Scan it, then scan the assembly, then scan each part you have on hand for the build. Each part is confirmed against the BOM as you go. When you scan INV-STOP, a Pass/Fail summary lists parts that were verified, parts scanned that don’t belong, and parts in the BOM that were never scanned — a quick way to confirm a kit is complete before it leaves the stockroom.
Inventory Location Labels
Standard Time® supports inventory locations, which allow a single inventory item to be tracked across multiple warehouses, bins, shelves, or vehicles simultaneously. Each location maintains its own independent stock level, so you can know precisely how many units are in the main warehouse, how many are in Bin A-3 on the shop floor, and how many are loaded on a service truck — all as separate counts for the same part number.
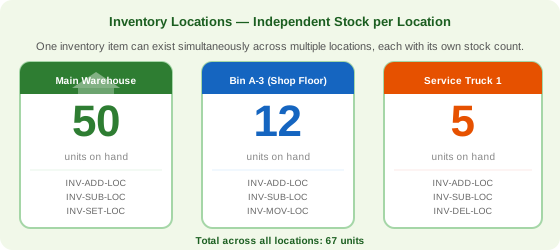
The five location barcode labels each handle a different management task:
| Label | Action | When to Use |
|---|---|---|
| INV-ADD-LOC | Add a quantity to a specific location's stock | Receiving goods at a particular bin or warehouse; transferring stock into a location |
| INV-SUB-LOC | Deduct a quantity from a specific location's stock | Pulling parts from a named bin; consuming material from a specific storage location |
| INV-SET-LOC | Set a location's stock to an exact count | After a physical count — set the bin to the verified quantity rather than adjusting up or down |
| INV-MOV-LOC | Move a quantity from one location to another | Relocating stock between warehouses, bins, or vehicles; replenishing a floor bin from a main warehouse |
| INV-DEL-LOC | Delete a location record for an item | Removing a bin assignment that is no longer in use; cleaning up obsolete location records |
How a Location Scan Works
Each location label scan follows the same prompt sequence: scan the label, enter the item identifier, enter the location name (or scan a location label), and enter the quantity where applicable. Standard Time® then updates that location's stock level while leaving all other locations for the same item unchanged.
Location vs. Global Stock
Items that have location records display their total global stock (the sum across all locations) alongside the per-location breakdown. Scanning an item's own barcode label directly — without a location label — deducts from the global stock total and does not target any specific location. For tight location accuracy, use the INV-SUB-LOC label for all consumption so every transaction is tied to a named bin.